www.wimb.net - Nutrition Calculator
The program then calculates the total Calories par day.
You can also see that day how your food was spread over the meals of that day.
Of course, it is very important to be accurate with the food you used.
Any error or mistake will give a wrong value.
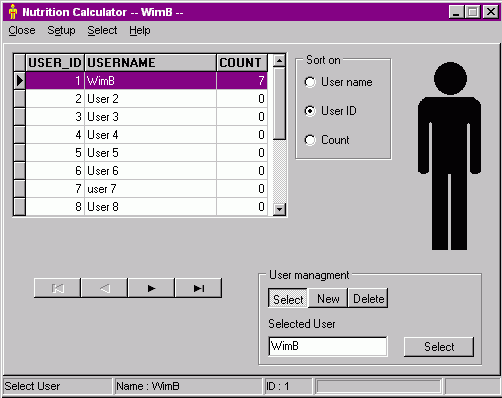
Select User
This screen is made of three sections:
- The table with the user data
- The box with three radio buttons to select the sort order of the user table
- The "User management" section to select, delete or add a user
The users can be sorted on: Name, ID or Count. The count represents the number of used food records. So you can find the most active user.
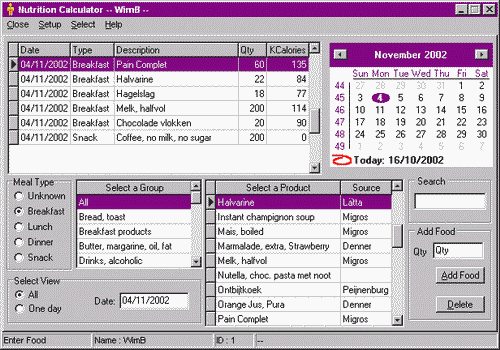
Food entry
Here you can enter the food that you eat. The quantity is in gram. First you have to select the type of meal, like breakfast or lunch. For the users who eat always, there is the special rubric "Snacks".
With the calendar you can choose the date, then go to "Select Product", enter the quantity and finally press the "Add Food" button.
The new record comes in the table together with the other food. It is sorted on date and meal type. With the "All" or "One Day" button the selection between all entered food or one single day can be made. In the Calendar, the days with food are in bold
Also the "Select a Group" is functioning. This is to select a group of food from the food table. However, it is not so useful for only a few food products.
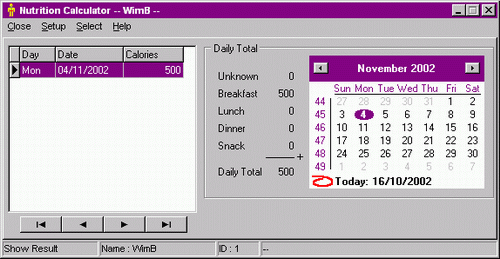
Show result
The result screen has a table with for each day a line with the total used food for that specific day. If that day is selected on the calendar then the small field left of the calendar shows the specific day, separated in the type of meal. There you can see if the food is spread properly over the different meals.
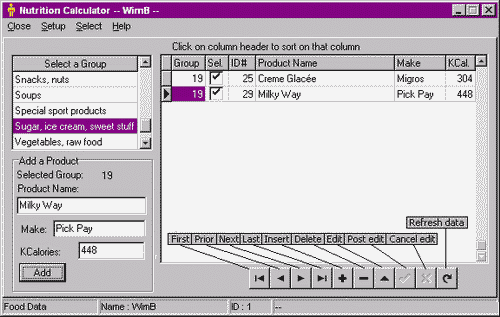
Food Data
On this screen the food data can be entered. It should be not too difficult. The main problem is to collect the correct data about the food. The first step is to select at which group the new food should be added. This can be done with the "Select a Group" section.
In this example we go to add a Milky Way Candy bar. This goes in the group "Sugar, ice cream, sweet stuff". The group number for this group is 19. The selection with "All" at the top, is to view all of the entered food. It is not possible to enter new food when "All" is selected.
In the next step you have to enter the name of the new product, the manufacturers name or the shop where you bought it. Finally you have to enter the number of calories per 100 gram When this is all done click on the "Add" button to enter the new food in the food table.
The new food should appear in the table, as shown above. With the checkbox you can select which food appears in the Enter Food screen. The number for the "FOOD_ID" is made automatically. The table is scanned for the highest number and this number is incremented by one. This is then the new number.
Second method Another method to add new food data is to use the standard Data Base Navigator. This one can also be used to edit data. However, there is no error protection; any fault may cause damage to the Food table. So, be fore any editing, make a backup of this table.
The functions are shown in the picture. Make sure that the FOOD_ID has a correct value. The same for the GROUP_ID. With the checkbox you can select which food appears in the Food Entry screen.
NOTE: In a future version it should be possible to use the checkboxes to make a separate selection for each user.
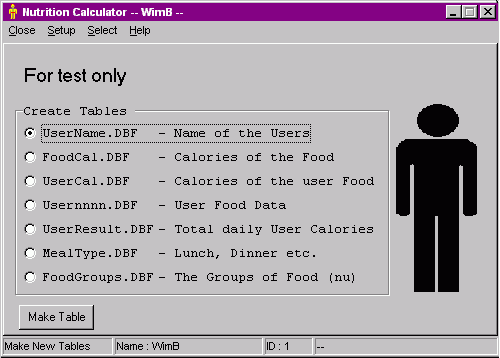
Make New tables
Here any missing table can be made. Please not that they are empty then. If a table exists, then the new table will not be made. All tables have to be placed in the same directory as the program itself.
For more information about the Body Mass Index look here
![]() This program is made with the tDBF component from Pascal GANAYE, now maintained by Micha Nelissen. The website with the component and forum is here
This program is made with the tDBF component from Pascal GANAYE, now maintained by Micha Nelissen. The website with the component and forum is here
Please note that this version is for test only. Also the Food table with the calories contains only a few products.
Updated 2007 Oct. 09


