www.wimb.net - Roll Over Factory

Main screen
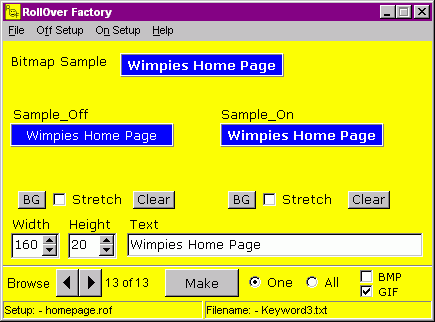
The main screen of the program consists of different sections.
The standard menu is at the top. Below that there are three places where the Roll Over can be seen.
A "real" version at the top and then an "off" version and an "On" version.
Further more the buttons for the background and just below this, the settings for the size and a place to enter or view the text for the roll over.
At the bottom are some buttons to scroll manually through the list of words and to make one or all rollovers.
The "prefix" is a small field where one or more characters can be placed, to be used before the filename of the rollover. Now it is simple to create groups of rollovers that start all with the same characters. The rest of the rollover filename is made from the rollover text itself. All spaces are removed and what's leftover is the filename. The program can make BMP or GIF files. The GIF output is made with the GifImage component from Anders Melander.
File menu
File ¦ Load Setup A previous saved setup file can be loaded. Such a file contains all of the data about the Roll Over". You can make different files for different WebPages.
File ¦ Save Setup Save the setup of a Rollover. Please note that the file extension is *.rol
KEYWORDS.TXT
Open the keyword editor. The file with the keywords is a standard ASCII file and can be edited with any ASCII editor. Another file with keywords can also be opened; these new words will be transferred automatically to the program.
The Keyword Editor is to manage the file KEYWORDS.TXT . This file is automatically opened when the program starts.
In the main program the keywords are used to determine which word has to be converted to bold.
This should be the same words as are put in bold with the MCPI editor, when the option "key word checking on" is enabled.
Editing Existing words can be edited in the edit box at the bottom of the form. Select the word to be edited, click with the left mouse button in the edit box, modify the word and press the enter key. Now the word is stored in the list. To use it a next time it must be saved to the file "KEYWORDS.TXT".
New wordsSelect File | add record.
A new, empty record is added to the bottom of the list of keywords. Go to the bottom of the list, click with the left mouse button on the empty place and type the new word in the edit box at the bottom of the form. To add the word to the list press the enter key. With File | Keywords sort, the new word will be placed on its correct position. Now save the file to have the new word also available when the program starts the next time.
Delete words
Select the word to be deleted. Click in the edit box at the bottom of the form and remove the whole word with backspace or the delete key. Then press the enter key. Then with keywords sort, the empty place will be removed from the list. Now the list can be saved.
Examples:
The "On" and "Off" setup de have both the same facilities. Below you can see the effect of the settings on the "On" picture.
![]() This is the normal "Off" picture.
This is the normal "Off" picture.
Now the "On" versions:
Several combinations are possible, however, be careful when using several settings together. It may end up in an unreadable text.
Please note that above pictures do have a manual added border, otherwise they would have been badly visible against the white background of this page.
Updated 2007 Oct. 09


